How The Rails Request Lifecycle Works
Learn how the Rails request lifecycle works, from the web server and middleware to routing, controllers, views, and the response.
By Jean Emmanuel Cadet • 23 min read
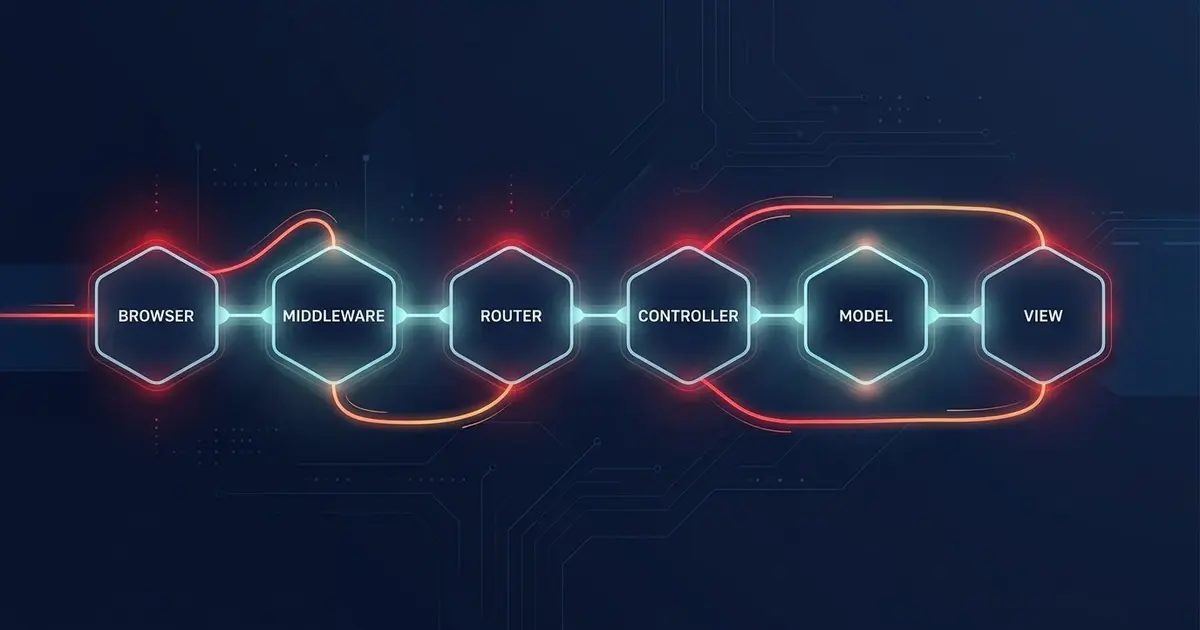
When you type a URL and press Enter, a lot happens before your Rails controller runs a single line of code, and a lot more happens before the browser paints anything. The Rails request lifecycle is the path an HTTP request takes through your application, from the network to the web server, through middleware, routing, a controller, the models and database, a view, and back out as an HTTP response.
If you understand this flow, debugging gets easier. You know where to look when a route does not match, a cookie disappears, a callback halts a request, or a redirect loops. This guide walks through the Rails request flow one stage at a time, with code you can copy and adapt.
What Is the Rails Request Lifecycle?
The Rails request lifecycle (also called the Rails request cycle or request response cycle) is the sequence of steps Rails follows to turn an incoming HTTP request into an HTTP response.
Here is the short version:
Browser
  |
  |  HTTP request
  v
Web server / app server (Thruster, Puma)
  |
  v
Rack middleware stack
  |
  v
Router (config/routes.rb)
  |
  v
Controller (callbacks, params, action)
  |
  v
Models and database (Active Record)
  |
  v
View rendering (template, layout, partials)
  |
  v
Middleware stack again (on the way out)
  |
  v
HTTP response back to the browser
Every stage has a single job:
- The server accepts the connection and hands Rails a request.
- Middleware wraps the request with cross-cutting features like cookies, sessions, logging, and error handling.
- The router decides which controller and action should handle the request.
- The controller coordinates the work, talks to models, and decides what to respond with.
- Models read and write data through Active Record.
- Views turn data into HTML, or you render JSON or another format.
- The response travels back through the middleware and out to the client.
The rest of this article explains each stage in detail and then follows one real request from start to finish.
How an HTTP Request Reaches a Rails Application
An HTTP request is just text sent over a TCP connection. A simple request to view a blog post looks like this:
GET /posts/42 HTTP/1.1
Host: example.com
Accept: text/html
Cookie: _my_app_session=abc123
User-Agent: Mozilla/5.0
It contains four important pieces:
- A method (
GET) that says what the client wants to do. - A path (
/posts/42) that says which resource it wants. - Headers such as
Host,Accept, andCookie. - An optional body, used by
POST,PATCH, andPUTrequests.
Before Rails sees any of this, DNS resolves the domain to an IP address, the browser opens a connection (with TLS for HTTPS), and the request is sent to your server.
The Role of the Web Server and Application Server
Rails does not listen on a network port by itself. It relies on servers that speak HTTP and hand requests to Rails through Rack, the Ruby interface between web servers and Ruby web applications.
In a typical modern Rails deployment, you will see two layers:
- A front-facing web server or proxy, such as Nginx or Thruster in the default Rails 8 Docker setup. It handles TLS, static file caching, compression, and buffering slow clients.
- An application server, which is Puma by default. It runs your Ruby code, using threads and optionally multiple worker processes to handle several requests at once.
Puma converts the raw HTTP request into a Rack env, a Ruby hash that describes the request. Then it calls your application:
# The Rack contract: any object that responds to call(env)
# and returns [status, headers, body]
class HelloApp
  def call(env)
    [200, { "content-type" => "text/plain" }, ["Hello from Rack"]]
  end
end
Your Rails application is a Rack application. You can see this in config.ru:
# config.ru
require_relative "config/environment"

run Rails.application
Rails.application responds to call(env). That single method call is where the Rails request lifecycle begins.
How Rails Receives and Processes the Request
When Puma calls Rails.application.call(env), Rails builds the machinery it needs to handle the request. Two objects matter most:
ActionDispatch::Request, a wrapper around the Rack env that gives you friendly methods likerequest.path,request.headers,request.format, andrequest.remote_ip.ActionDispatch::Response, which collects the status, headers, and body you will send back.
You can inspect the request object from any controller:
class DebugController < ApplicationController
  def show
    render json: {
      method: request.method,
      path: request.path,
      format: request.format.to_s,
      ip: request.remote_ip,
      user_agent: request.user_agent
    }
  end
end
Before the request reaches the router, it passes through the middleware stack.
The Role of Middleware in the Rails Request Lifecycle
Middleware is a chain of small Rack components. Each one receives the request, can do work before passing it down the chain, and can do more work after the rest of the chain returns a response. Think of it as layers of an onion: the request travels inward, and the response travels back outward.
You can list your app's middleware with:
bin/rails middleware
The exact list varies by Rails version and configuration, but it includes components like these:
ActionDispatch::HostAuthorizationblocks requests for hosts you have not allowed.ActionDispatch::Staticserves static files frompublic/when configured to do so.ActionDispatch::RequestIdassigns a unique ID to each request for tracing in logs.ActionDispatch::RemoteIpworks out the real client IP address.Rails::Rack::Loggerlogs the start and end of each request.ActionDispatch::ShowExceptionsandActionDispatch::DebugExceptionsconvert exceptions into error responses.ActionDispatch::Cookiesreads and writes cookies.ActionDispatch::Session::CookieStoreloads and saves the session.ActionDispatch::Flashmanages flash messages.Rack::ETagandRack::ConditionalGetsupport conditional HTTP caching.
A Simple Custom Middleware Example
A middleware is any object with an initialize(app) method and a call(env) method. This one measures how long the rest of the stack takes and adds a header:
# app/middleware/response_timer.rb
class ResponseTimer
  def initialize(app)
    @app = app
  end

  def call(env)
    started_at = Process.clock_gettime(Process::CLOCK_MONOTONIC)

    status, headers, body = @app.call(env)

    elapsed_ms = ((Process.clock_gettime(Process::CLOCK_MONOTONIC) - started_at) * 1000).round(1)
    headers["x-response-time-ms"] = elapsed_ms.to_s

    [status, headers, body]
  end
end
Register it in your application config:
# config/application.rb
config.middleware.use ResponseTimer
Expected behavior: every response now includes an x-response-time-ms header. The code before @app.call(env) runs on the way in, and the code after it runs on the way out.
Use middleware for concerns that apply to every request regardless of route, such as request timing, IP filtering, or custom headers. Use controller callbacks for logic that belongs to specific controllers or actions.
How the Rails Router Matches a Request
After the middleware stack, the request reaches the router. The router compares the HTTP method and path against the routes defined in config/routes.rb and finds the first match.
# config/routes.rb
Rails.application.routes.draw do
  root "posts#index"

  resources :posts do
    resources :comments, only: [:create, :destroy]
  end

  get "/about", to: "pages#about"
end
The line resources :posts generates seven standard routes. You can see them with:
bin/rails routes -g posts
   Prefix Verb   URI Pattern               Controller#Action
    posts GET    /posts(.:format)          posts#index
          POST   /posts(.:format)          posts#create
 new_post GET    /posts/new(.:format)      posts#new
edit_post GET    /posts/:id/edit(.:format) posts#edit
     post GET    /posts/:id(.:format)      posts#show
          PATCH  /posts/:id(.:format)      posts#update
          PUT    /posts/:id(.:format)      posts#update
          DELETE /posts/:id(.:format)      posts#destroy
For our example request, GET /posts/42 matches posts#show. The router now knows the controller class (PostsController) and the action (show).
Order matters. Rails checks routes from top to bottom and stops at the first match, so a broad route placed too early can swallow requests meant for a more specific one. If you want to go deeper into route design, see how Rails routing works.
How Route Parameters Are Extracted
Dynamic segments in a route, like :id, are captured from the URL and stored as parameters. For GET /posts/42?ref=newsletter, Rails builds a params hash like this:
{
  "controller" => "posts",
  "action" => "show",
  "id" => "42",
  "ref" => "newsletter"
}
Notice two things. The route segment (id) and the query string (ref) end up in the same params object. Also, values from the URL are always strings, so "42" is not the integer 42.
What Happens Between the Route and the Controller Action
Once the router picks a controller and action, Rails instantiates the controller and calls process(:show). From here, Action Controller does several things in order:
- Creates a new instance of
PostsControllerfor this request. - Attaches the request, response, and params.
- Runs the callback chain (
before_action,around_action). - Calls your action method.
- Renders a response if you did not explicitly do so.
- Runs
after_actioncallbacks.
A new controller instance is created for every request, so instance variables set in one request never leak into another.
Controller Callbacks: before_action, after_action, and around_action
Callbacks let you run code before, after, or around an action. They keep controllers tidy by pulling out repeated logic.
class PostsController < ApplicationController
  before_action :set_post, only: %i[show edit update destroy]
  around_action :log_action_time
  after_action :track_view, only: :show

  def show
    # @post is already loaded by set_post
  end

  private

  def set_post
    @post = Post.find(params[:id])
  end

  def log_action_time
    started = Time.current
    yield
  ensure
    Rails.logger.info("Action took #{((Time.current - started) * 1000).round}ms")
  end

  def track_view
    Rails.logger.info("Post #{@post.id} viewed")
  end
end
The execution order for show is:
set_post(before)log_action_timestarts (around, beforeyield)showaction runs, and the view renderslog_action_timefinishes (around, afteryield)track_view(after)
Important behaviors to remember:
- If a
before_actioncallsrenderorredirect_to, the chain halts. The action never runs. only:andexcept:limit which actions a callback applies to.- An
around_actionmust callyield, or the action will not run. after_actioncallbacks run after the action and its rendering, but before the response is sent to the client, so they can still adjust headers.
How Rails Handles Parameters and params
Everything the client sends, whether it is a route segment, query string, or form body, arrives in params. Rails parses each format for you:
- Query strings and form bodies (
application/x-www-form-urlencoded) become nested hashes. - JSON bodies (
application/json) are parsed and merged intoparams. - Multipart uploads become
ActionDispatch::Http::UploadedFileobjects.
Never pass raw params to a model. Use strong parameters. In Rails 8, the preferred method is params.expect:
class PostsController < ApplicationController
  def create
    @post = Current.user.posts.build(post_params)

    if @post.save
      redirect_to @post, notice: "Post created."
    else
      render :new, status: :unprocessable_entity
    end
  end

  private

  def post_params
    params.expect(post: [:title, :body, :published])
  end
end
Expected behavior: params.expect requires a post key and permits only the listed attributes. If post is missing, Rails raises ActionController::ParameterMissing, which becomes a 400 Bad Request response. Unpermitted keys are ignored, which protects you from mass assignment problems.
Where Authentication and Authorization Fit
Authentication answers "who is making this request?" Authorization answers "are they allowed to do this?" Both usually happen in before_action callbacks, early in the controller stage, so that unauthorized requests never touch your business logic or database.
class ApplicationController < ActionController::Base
  before_action :require_authentication

  private

  def require_authentication
    redirect_to new_session_path, alert: "Please sign in." unless Current.user
  end
end
class PostsController < ApplicationController
  before_action :set_post, only: %i[edit update destroy]
  before_action :authorize_owner!, only: %i[edit update destroy]

  private

  def authorize_owner!
    head :forbidden unless @post.user_id == Current.user.id
  end
end
A typical browser-based flow works like this:
- The user signs in, and Rails stores an identifier in the session.
- On each later request, the session middleware loads the session.
- A
before_actionuses the session to find the current user. - If there is no valid user, Rails redirects to the sign-in page. If the user lacks permission, Rails returns
403 Forbidden.
Rails 8 ships with a built-in authentication generator that follows this pattern. If you are choosing between approaches, read Devise vs custom authentication in Rails. For token-based APIs, where there is no browser session, the same before_action idea applies, but the credential comes from an Authorization header instead. The Rails API authentication with JWT guide covers that in detail.
How the Controller Interacts with Models and the Database
The controller should coordinate, not contain business logic. It asks models for data, passes user input to them, and decides what to render.
class PostsController < ApplicationController
  def index
    @posts = Post.published.includes(:user).order(created_at: :desc).limit(20)
  end

  def show
    @post = Post.find(params[:id])
  end
end
# app/models/post.rb
class Post < ApplicationRecord
  belongs_to :user
  has_many :comments, dependent: :destroy

  validates :title, presence: true

  scope :published, -> { where(published: true) }
end
How Active Record Queries Are Executed
Active Record queries are lazy. Building a relation does not hit the database. The SQL runs only when you actually need the data.
posts = Post.published.order(created_at: :desc)  # no SQL yet
posts.each { |post| puts post.title }            # SQL runs here
Common triggers that execute a query include each, to_a, first, find, count, pluck, and calling a relation in a view loop. When a query runs, Active Record does this:
- Builds an SQL string from the relation.
- Checks out a connection from the connection pool.
- Sends the SQL to the database and waits for results.
- Instantiates model objects from the returned rows.
Because the relation is lazy, the query often runs during view rendering, not in the controller. That is why an N+1 problem often shows up in the view, even though the fix (includes) belongs in the controller.
For our GET /posts/42 request, Post.find(params[:id]) produces roughly:
SELECT "posts".* FROM "posts" WHERE "posts"."id" = 42 LIMIT 1
If no row exists, find raises ActiveRecord::RecordNotFound, which Rails turns into a 404 Not Found in production. Errors get their own section below.
How Rails Renders Views
After the action method finishes, Rails needs a response. If you did not call render, redirect_to, or head, Rails performs an implicit render. It looks for a template that matches the controller and action, for example app/views/posts/show.html.erb.
<%# app/views/posts/show.html.erb %>
<article>
  <h1><%= @post.title %></h1>
  <p class="meta">By <%= @post.user.name %></p>
  <div><%= simple_format(@post.body) %></div>
</article>

<section>
  <h2>Comments</h2>
  <%= render @post.comments %>
</section>
Instance variables assigned in the controller, like @post, are copied into the view so the template can use them. Rails also picks the template based on the request format. An HTML request looks for show.html.erb, while a JSON request could use show.json.jbuilder.
Templates, Layouts, and Partials
Three pieces combine to produce the final HTML:
- Template: the main view for the action, such as
posts/show.html.erb. - Layout: a wrapper shared by many templates, normally
app/views/layouts/application.html.erb. The template output is inserted where the layout callsyield. - Partial: a reusable fragment, named with a leading underscore, such as
_comment.html.erb.
<%# app/views/layouts/application.html.erb %>
<!DOCTYPE html>
<html>
  <head>
    <title><%= content_for(:title) || "My App" %></title>
    <%= csrf_meta_tags %>
    <%= csp_meta_tag %>
    <%= stylesheet_link_tag :app %>
    <%= javascript_importmap_tags %>
  </head>
  <body>
    <%= render "shared/flash" %>
    <%= yield %>
  </body>
</html>
<%# app/views/comments/_comment.html.erb %>
<div id="<%= dom_id(comment) %>">
  <strong><%= comment.user.name %></strong>
  <p><%= comment.body %></p>
</div>
The line render @post.comments renders the _comment partial once for each comment, using collection rendering. Rails first renders the template, then wraps it in the layout, and the result becomes the response body.
How Rails Generates the Final HTTP Response
An HTTP response has three parts: a status code, headers, and a body.
HTTP/1.1 200 OK
Content-Type: text/html; charset=utf-8
Cache-Control: max-age=0, private, must-revalidate
ETag: W/"5d41402abc4b2a76b9719d911017c592"
Set-Cookie: _my_app_session=...; path=/; HttpOnly; SameSite=Lax

<!DOCTYPE html>
<html>...</html>
After the controller finishes, Rails hands the response back up through the middleware stack. On the way out, middleware can add or modify things. For example, the cookie and session middleware write Set-Cookie headers, and Rack::ETag may compute an ETag so the browser can make conditional requests later.
Status Codes, Headers, and Bodies in Practice
You will use a small set of status codes most of the time:
200 OK: success with a body.201 Created: a resource was created (common in APIs).204 No Content: success with no body.301and302/303: redirects.400 Bad Request: malformed input or missing params.401 Unauthorized: not authenticated.403 Forbidden: authenticated but not allowed.404 Not Found: no such resource.422 Unprocessable Entity: validation failed, or the CSRF token was invalid.500 Internal Server Error: an unhandled exception.
You can set them explicitly:
render :new, status: :unprocessable_entity
head :no_content
render json: { error: "Not found" }, status: :not_found
response.headers["X-Custom-Header"] = "hello"
Responding with HTML, JSON, Redirects, and Other Formats
The same action can respond in different ways depending on the request. Rails uses respond_to to pick based on the Accept header or the URL extension.
def show
  @post = Post.find(params[:id])

  respond_to do |format|
    format.html                                  # renders show.html.erb
    format.json { render json: @post }           # renders JSON
    format.pdf  { send_data generate_pdf(@post), type: "application/pdf" }
  end
end
HTML Responses
The default browser response. Rails renders the template inside the layout and sends Content-Type: text/html.
JSON Responses
render json: serializes an object and sets Content-Type: application/json. For a full API workflow, see how to build a Rails JSON API.
render json: { id: @post.id, title: @post.title }, status: :okOther Response Types
send_fileandsend_datareturn files for download.head :no_contentreturns only a status and headers.render plain: "OK"returns plain text.
Redirects and Why They Trigger a New Request
A redirect does not send a page. It sends a status code (usually 302 or 303) and a Location header. The browser then makes a brand new request to that URL.
def create
  @post = Current.user.posts.build(post_params)

  if @post.save
    redirect_to @post, notice: "Post created."
  else
    render :new, status: :unprocessable_entity
  end
end
On success, the browser receives:
HTTP/1.1 302 Found
Location: https://example.com/posts/43
Then the browser sends GET /posts/43, and the whole request lifecycle starts again from the beginning. This is the Post/Redirect/Get pattern. It prevents duplicate form submissions when a user refreshes the page, because the browser's last action is a harmless GET.
Notice that a failed save uses render :new, not a redirect. The form is re-rendered in the same request so the submitted values and validation errors are still available. Use status: :unprocessable_entity so Turbo and browsers treat it as a failed submission.
Sessions, Cookies, and Flash Messages During a Request
HTTP is stateless, so Rails uses cookies to carry state between requests.
Cookies
Cookies are small key/value pairs stored by the browser and sent with every request to your domain. Rails gives you a cookies object:
cookies[:theme] = "dark"                             # plain cookie
cookies.signed[:user_id] = 42                        # tamper-proof
cookies.encrypted[:token] = "secret"                 # encrypted
cookies[:theme] = { value: "dark", expires: 1.year.from_now, httponly: true }
Sessions
The session is a hash that persists across requests. By default, Rails stores it in an encrypted cookie:
session[:cart_id] = @cart.id
Cart.find(session[:cart_id])
During the lifecycle:
- On the way in, the session middleware reads the cookie, decrypts it, and loads the hash.
- Your controller reads and writes
session. - On the way out, the middleware serializes any changes and adds a
Set-Cookieheader.
Keep sessions small. Cookies have a size limit of around 4 KB, and they are sent on every request.
Flash Messages
The flash is a special part of the session that lives for exactly one more request. It is designed to work with redirects:
redirect_to @post, notice: "Post created."
- Request 1 sets
flash[:notice]and responds with a redirect. - Request 2 (the redirected
GET) can readflash[:notice]and display it. - After request 2 finishes, the flash is cleared.
If you want a message to show in the current request without a redirect, use flash.now:
flash.now[:alert] = "Please fix the errors below."
render :new, status: :unprocessable_entity
How CSRF Protection Fits Into the Lifecycle
Cross-Site Request Forgery (CSRF) is an attack where a malicious site tricks a logged-in user's browser into sending a state-changing request to your app. Because browsers automatically attach cookies, your app could mistake the forged request for a legitimate one.
Rails defends against this with an authenticity token. Here is how it fits the lifecycle:
- When rendering a form, Rails embeds a token in a hidden field. The layout also includes it via
csrf_meta_tags. - When the form is submitted with
POST,PATCH,PUT, orDELETE, the token is sent back. - Early in the controller stage, Rails compares the submitted token with the one stored in the session.
- If they do not match, Rails raises
ActionController::InvalidAuthenticityToken, which results in a422response.
<%= form_with model: @post do |form| %>
  <%# Rails adds a hidden authenticity_token field automatically %>
  <%= form.text_field :title %>
  <%= form.submit %>
<% end %>
GET requests are not checked, which is why you should never change data in a GET action.
Rails enables this protection by default for controllers that inherit from ActionController::Base. For token-authenticated JSON APIs, where the client does not rely on browser cookies, you normally use ActionController::API or skip CSRF checks for those endpoints:
class Api::BaseController < ActionController::API
  # No CSRF protection needed when authentication uses an Authorization header
end
Only skip CSRF protection when the endpoint does not authenticate through cookies.
How Exceptions and Errors Are Handled
Errors can happen at any stage: a missing record, a validation failure, an authorization problem, or a bug in your code. Rails handles them in layers.
Layer 1: Rescue in the Controller
Use rescue_from to handle known exceptions in one place:
class ApplicationController < ActionController::Base
  rescue_from ActiveRecord::RecordNotFound, with: :not_found
  rescue_from ActionController::ParameterMissing, with: :bad_request

  private

  def not_found
    respond_to do |format|
      format.html { render "errors/not_found", status: :not_found }
      format.json { render json: { error: "Not found" }, status: :not_found }
    end
  end

  def bad_request
    head :bad_request
  end
end
Expected behavior: a missing post shows your custom 404 page for HTML requests and a JSON error for API requests, instead of a generic error page.
Layer 2: Exception Middleware
If an exception is not rescued in the controller, it travels back up the middleware stack. Two middleware components deal with it:
ActionDispatch::DebugExceptionsrenders the detailed debug page in development.ActionDispatch::ShowExceptionsconverts the exception into an HTTP response in production, using an exceptions app.
Rails maps common exceptions to status codes. For example, ActiveRecord::RecordNotFound becomes 404, ActionController::RoutingError becomes 404, ActionController::ParameterMissing becomes 400, and ActionController::InvalidAuthenticityToken becomes 422. Unknown exceptions become 500.
Layer 3: Error Pages
In production, if you have not customized anything, Rails serves the static files in public/, such as 404.html, 422.html, and 500.html. If you want dynamic error pages, point Rails at your own routes:
# config/application.rb
config.exceptions_app = routes
# config/routes.rb
match "/404", to: "errors#not_found", via: :all
match "/500", to: "errors#internal_server_error", via: :all
Static error pages are a good choice for 500 errors because they keep working even if your app or database is broken.
Turbo Requests vs Normal Full-Page Requests
Modern Rails applications include Turbo by default. Turbo changes how the browser makes requests, but the server-side lifecycle stays almost the same.
A Normal Full-Page Request
Without Turbo, clicking a link makes the browser discard the current page, request a new one, and load everything from scratch, including CSS and JavaScript.
A Turbo Drive Request
With Turbo Drive, Turbo intercepts link clicks and form submissions. It sends the request using fetch, then replaces the <body> of the current page with the new response and merges the <head>. The JavaScript and CSS are not reloaded. On the server, this is still a normal Rails request that goes through routing, middleware, controllers, and views, and returns a full HTML document.
Turbo Frames
A Turbo Frame limits an update to one part of the page. When a request comes from inside a frame, Turbo sends a Turbo-Frame header with the frame's ID. Rails uses this to render the response without the full layout, and Turbo extracts the matching frame from the response.
<%= turbo_frame_tag dom_id(@post, :details) do %>
  <h2><%= @post.title %></h2>
  <%= link_to "Edit", edit_post_path(@post) %>
<% end %>
<%# app/views/posts/edit.html.erb %>
<%= turbo_frame_tag dom_id(@post, :details) do %>
  <%= render "form", post: @post %>
<% end %>
Clicking "Edit" sends a request to posts#edit. The controller code does not change. The response only needs a matching frame, and Turbo swaps just that region. For a full walkthrough, read how Turbo Frames work in Ruby on Rails.
Turbo Streams
A response with Content-Type: text/vnd.turbo-stream.html can contain instructions to append, replace, or remove specific elements:
def create
  @comment = @post.comments.build(comment_params)

  if @comment.save
    respond_to do |format|
      format.turbo_stream
      format.html { redirect_to @post }
    end
  else
    render :new, status: :unprocessable_entity
  end
end
<%# app/views/comments/create.turbo_stream.erb %>
<%= turbo_stream.append "comments", @comment %>
Practical Differences to Remember
- Turbo form submissions expect a redirect after success and a
422render on validation failure. Without the right status codes, Turbo may not update the page. - The lifecycle on the server is the same: router, controller, model, view. Only the client behavior and the response format change.
- Redirects still cause a second request, but Turbo follows them via
fetchand updates the page without a full reload.
An End-to-End Example: Following One Request
Let us trace a real request from start to finish. A signed-in user opens the form to create a comment, submits it, and sees the updated post.
The route:
resources :posts do
  resources :comments, only: :create
end
The controller:
class CommentsController < ApplicationController
  before_action :require_authentication
  before_action :set_post

  def create
    @comment = @post.comments.build(comment_params.merge(user: Current.user))

    if @comment.save
      redirect_to @post, notice: "Comment added."
    else
      render "posts/show", status: :unprocessable_entity
    end
  end

  private

  def set_post
    @post = Post.find(params[:post_id])
  end

  def comment_params
    params.expect(comment: [:body])
  end
end
The request:
POST /posts/42/comments HTTP/1.1
Host: example.com
Content-Type: application/x-www-form-urlencoded
Cookie: _my_app_session=abc123

authenticity_token=...&comment[body]=Great+article
What happens, step by step:
- Server: Thruster and Puma accept the connection and build the Rack env.
- Middleware (in): The host check passes. A request ID is assigned. Cookies are parsed, and the session is loaded from
_my_app_session. The flash from any earlier request is loaded. - Router:
POST /posts/42/commentsmatchescomments#create. Params arepost_id: "42"plus the form fields. - Controller setup: A new
CommentsControlleris created. Rails verifies the CSRF authenticity token. - Callbacks:
require_authenticationconfirms the user is signed in.set_postrunsPost.find("42"), which executes a SQL query. - Action:
params.expectfilters the comment attributes.@post.comments.buildcreates the object, and@comment.saveruns validations and anINSERTin a transaction. - Response: The save succeeds, so
redirect_to @postsets a302status, aLocation: /posts/42header, andflash[:notice]. - Middleware (out): The flash and session are written into a
Set-Cookieheader. The response is logged. - Browser: Receives the
302and sendsGET /posts/42. - Second lifecycle: The router matches
posts#show. The controller loads the post and comments, and the view renders inside the layout. The flash notice is displayed, then cleared. - Final response: The browser receives
200 OKwith the HTML body.
Here is the whole flow in one diagram:
POST /posts/42/comments
  -> Puma
  -> Middleware (cookies, session, flash, request id)
  -> Router: comments#create
  -> CSRF check
  -> before_action: require_authentication, set_post
  -> Post.find (SQL SELECT)
  -> comment.save (SQL INSERT)
  -> redirect_to post (302 + Set-Cookie)
  <- Middleware (write session and flash)
  <- Browser receives 302

GET /posts/42
  -> Middleware -> Router: posts#show
  -> Controller -> Active Record -> View + Layout
  <- 200 OK with HTML
If you ever get lost while debugging, this stage-by-stage view tells you where to look. A missing route points to routing. A missing session points to middleware. A wrong or missing record points to the model or a before_action. Bad HTML points to the view or layout.
How Everything Fits Together
Each part of the Rails stack has a clear responsibility:
- Middleware handles cross-cutting concerns for every request, such as cookies, sessions, logging, and error conversion.
- Routing maps the method and path to a controller and action, and extracts route parameters.
- Controllers run callbacks, check authentication and authorization, read
params, call models, and choose a response. - Models encapsulate data access and business rules through Active Record.
- Views turn data into HTML using templates, layouts, and partials.
- Responses package a status code, headers, and a body, then travel back out through the middleware.
Once you can name the stage a problem belongs to, you can debug it much faster.
Practical Tips for Debugging the Request Lifecycle
- Run
bin/rails routesto confirm which route and action a URL should hit. - Run
bin/rails middlewareto see the middleware stack in order. - Check
log/development.log. Each request shows the route, controller, action, parameters, SQL queries, rendered templates, and final status. - Use
request.headers,params, andsessionin a debugger or temporary log line to see exactly what Rails received. - Look at the browser's Network tab to see redirects, status codes, and headers.
A typical development log entry looks like this:
Started GET "/posts/42" for 127.0.0.1 at 2026-09-27 10:15:00 +0000
Processing by PostsController#show as HTML
  Parameters: {"id"=>"42"}
  Post Load (0.4ms)  SELECT "posts".* FROM "posts" WHERE "posts"."id" = 42 LIMIT 1
  Rendering posts/show.html.erb within layouts/application
  Rendered posts/show.html.erb within layouts/application (Duration: 3.1ms)
Completed 200 OK in 12ms
Read this log from top to bottom, and you can see the request lifecycle happening in real time.
Conclusion
The Rails request lifecycle is a clear pipeline: the server receives the HTTP request, middleware prepares it, the router picks a controller action, callbacks and params set up the work, models talk to the database, views render the output, and Rails sends a response back through the middleware to the browser. Redirects start the cycle again, sessions and cookies carry state between cycles, CSRF tokens protect form submissions, and Turbo changes how the browser sends and applies requests without changing the server-side flow.
The next time something breaks, ask yourself which stage the request was in. That single question will usually point you to the right file.